Build a Personal Image Hosting Service with Cloudflare R2
A practical setup for turning Cloudflare R2, Workers, D1, Pages, and TinyPNG into a personal image hosting workflow for a static blog.
When I first used Cloudflare R2 as an image host, the workflow was very rough: upload images in the R2 dashboard, then manually assemble the public URL. It worked, but it was not pleasant for long-term blogging. Uploading was tedious, images were hard to browse, URLs had to be copied manually, and there was no compression step.
Later I built a small visual image hosting app, then added automatic TinyPNG compression. Looking back, these were not separate topics. They are one complete workflow: R2 stores image files, Workers handles upload/query/delete APIs, D1 stores image metadata, Pages hosts the management UI, and TinyPNG compresses images before they are stored.
Chinese version of this article
This article documents a personal image hosting setup for a static blog. It is not meant to become a public SaaS product. It focuses on a few things that matter when writing:
- Upload images.
- Compress images automatically.
- Generate stable public image URLs.
- Browse uploaded images.
- Copy Markdown image syntax quickly.
- Delete images that are no longer needed.
- Keep the cost low enough for personal use.
Why R2
Static blogs are comfortable when posts are just Markdown files, but images quickly become a separate problem.
Putting images in the blog repository is simple, but the repository grows over time and migration becomes less clean. Serving images from a small cloud server also works, but personal servers usually have limited bandwidth, and it is not worth pushing image traffic through the same machine that serves the site.
Object storage is a better fit for image hosting. Cloudflare R2 is attractive here because:
- The object storage model is simple and well suited for images.
- It supports custom domains.
- It does not charge egress fees, which is friendly for read-heavy personal blog traffic.
- It works well with Workers, D1, and Pages in the same platform.
Cloudflare’s pricing and free quotas should be checked on the official page. This article focuses on the structure and tradeoffs that matter for a personal image host: Cloudflare R2 Pricing.
R2 is not the only option. Alibaba Cloud OSS, Tencent Cloud COS, and AWS S3 can all be used for similar setups. R2 is a good fit here mainly because a personal blog has mostly static image traffic, and Cloudflare’s egress policy and ecosystem match that use case well.
Architecture
The final architecture looks like this:
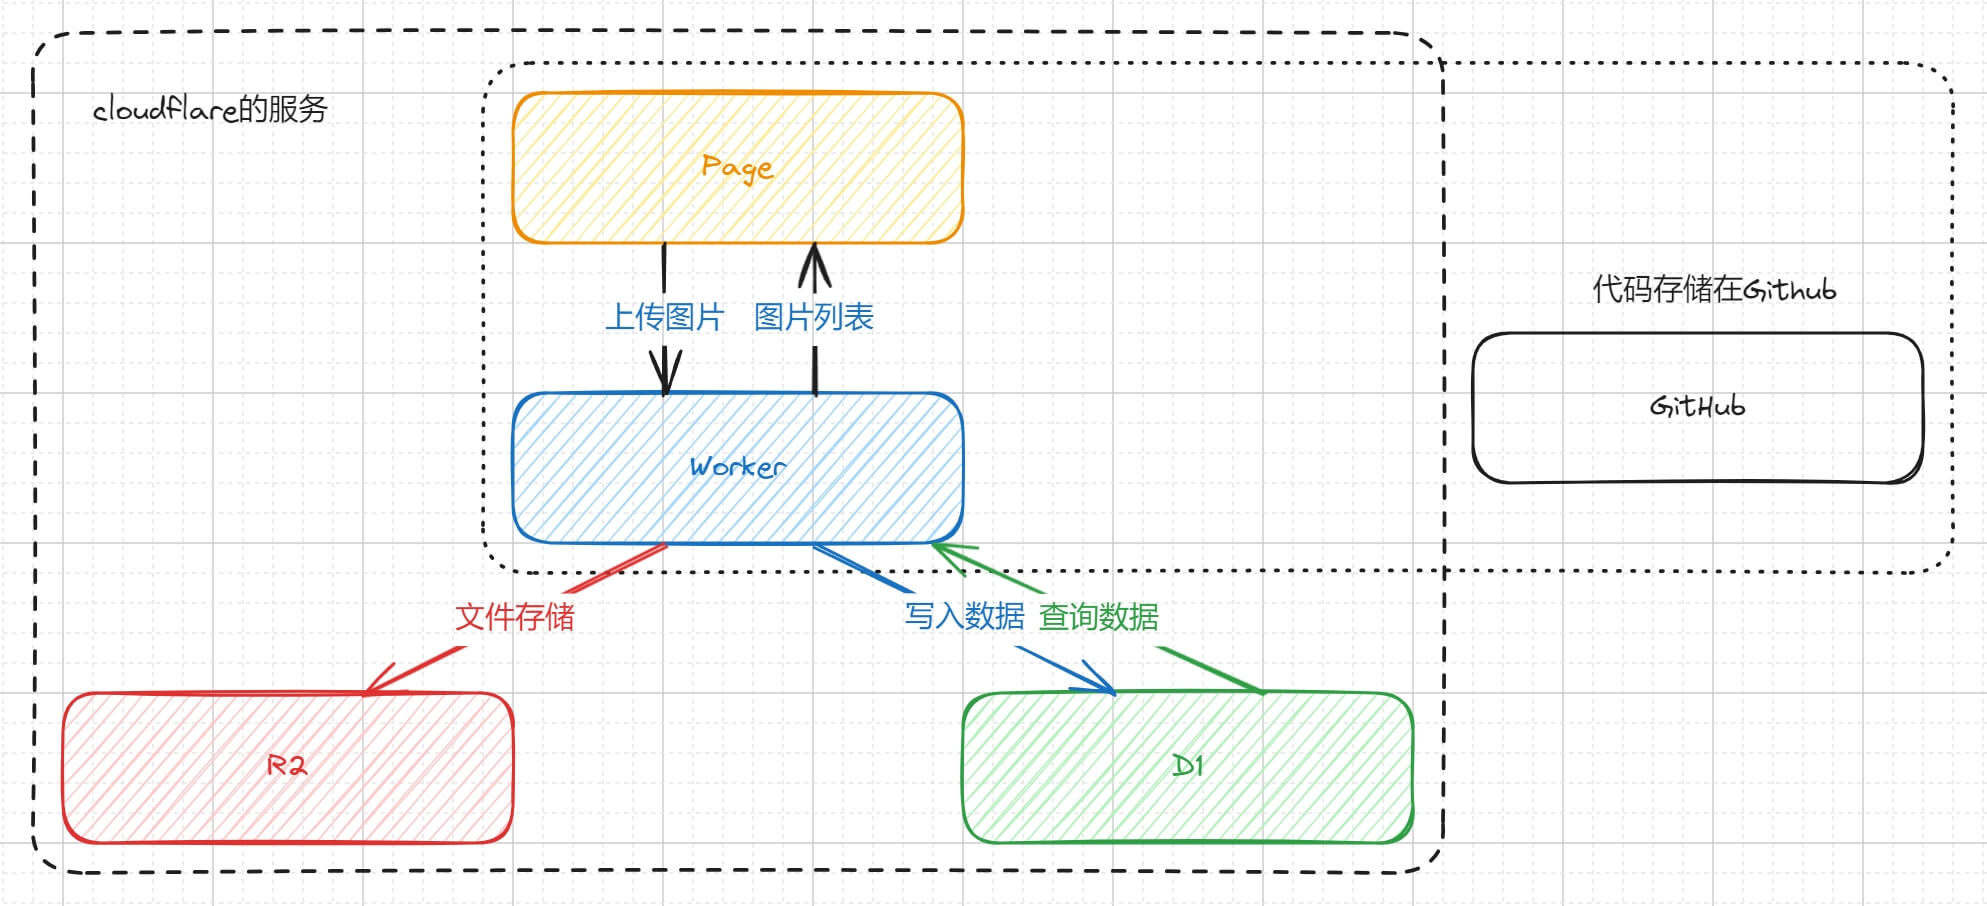
Cloudflare services used:
- R2: stores image files.
- D1: stores image metadata, such as file name, URL, created time, and size.
- Workers: provides upload, query, and delete APIs.
- Pages: hosts the frontend UI.
Additional services:
- GitHub: stores frontend and Worker code.
- TinyPNG/Tinify: compresses images.
- Custom domain: provides long-term stable image URLs.
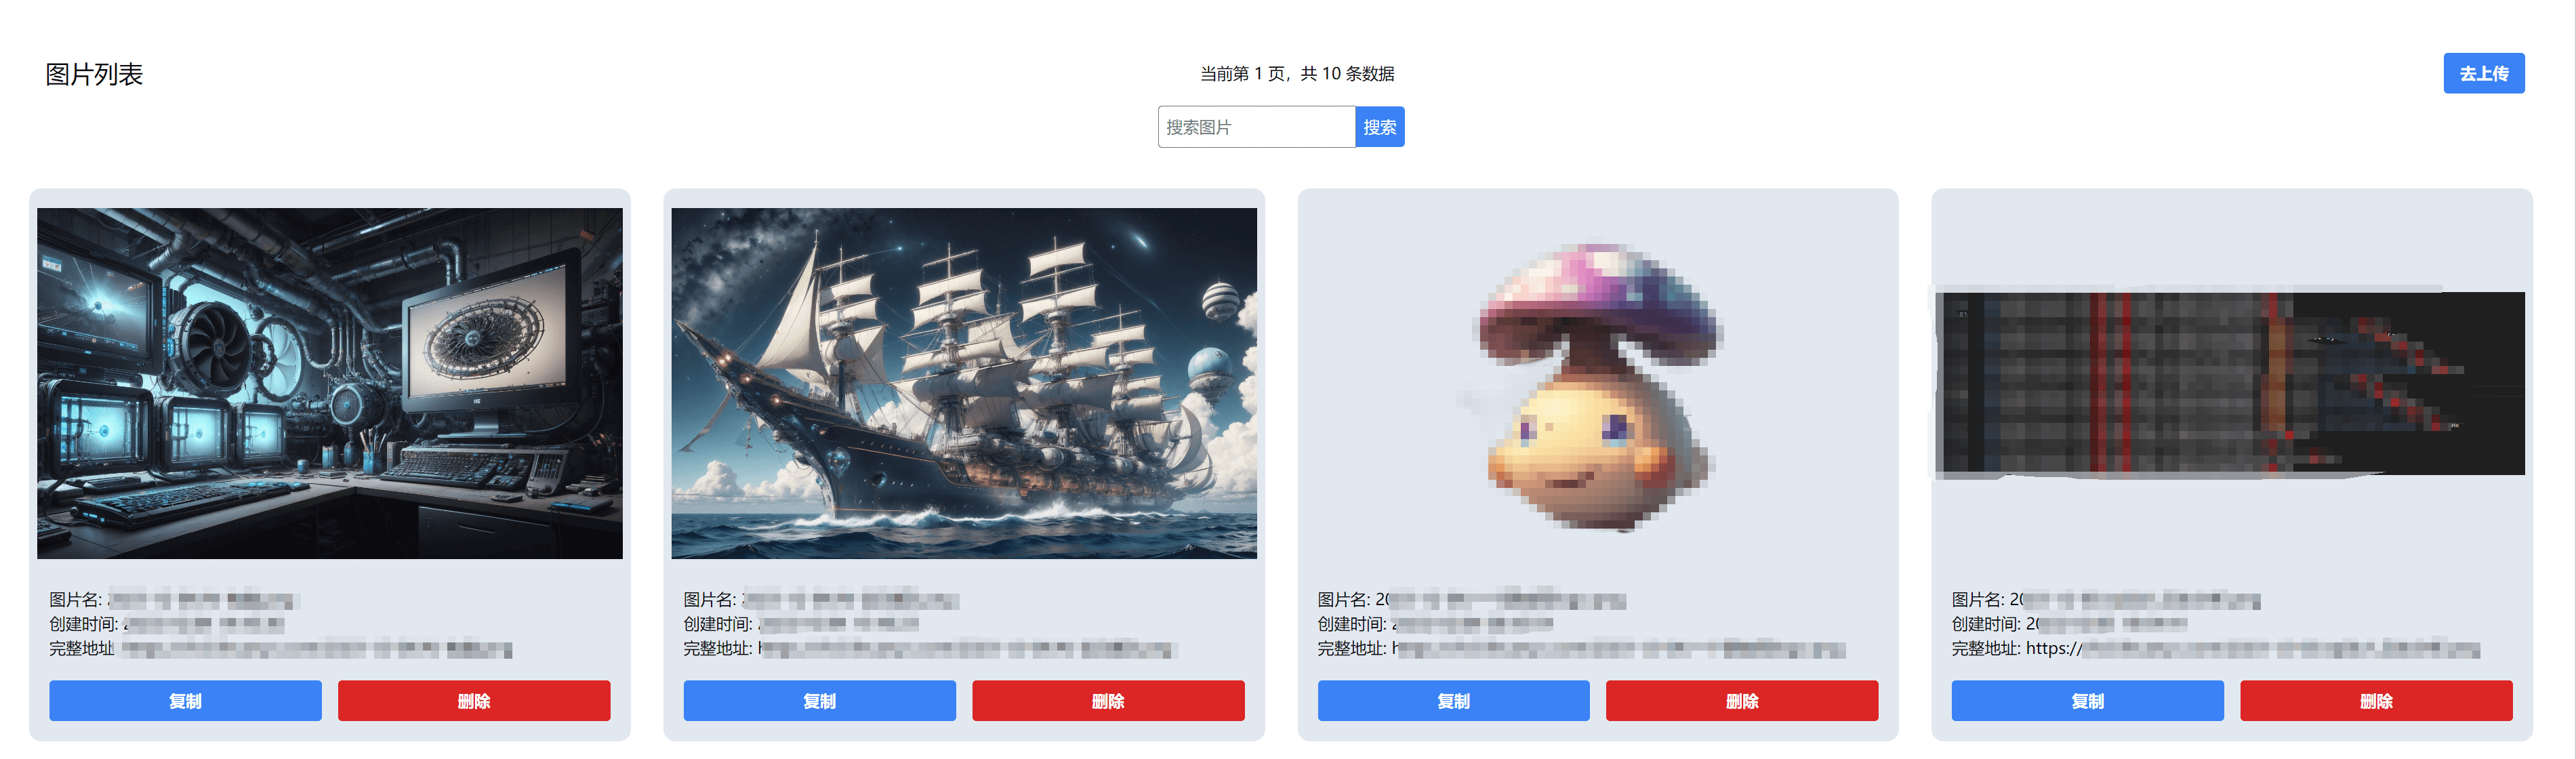
The finished app looks roughly like this:

Prepare R2
Create an R2 bucket in the Cloudflare dashboard, for example:
image-storage
After the bucket is created, the first thing to solve is public access. R2 buckets are private by default, but an image host needs URLs that browsers can load.
Cloudflare provides two options:
- Use public bucket access.
- Bind a custom domain.
For a personal blog, a custom domain is the better long-term choice, for example:
https://aipaint.lihuanyu.com
Cloudflare documents public buckets and custom domains here: Public buckets and custom domains.
Relying on the r2.dev preview domain for long-term production use is risky. It is not intended as a permanent production URL, and access from mainland China may not be stable. A custom domain is a better fit for URLs that will be embedded in old posts for years.
Prepare D1
R2 stores objects, but it is not a good place to handle image lists, search, or pagination. A small metadata table solves that part.
Create a D1 database, for example:
image-storage-record
Table schema:
CREATE TABLE IF NOT EXISTS images (
  id INTEGER PRIMARY KEY AUTOINCREMENT,
  object_key TEXT NOT NULL UNIQUE,
  original_name TEXT NOT NULL,
  image_url TEXT NOT NULL,
  content_type TEXT,
  size INTEGER NOT NULL DEFAULT 0,
  created_at INTEGER NOT NULL
);

CREATE INDEX IF NOT EXISTS idx_images_created_at ON images(created_at);
Field meanings:
object_key: the object key in R2, for example2026-05-03/uuid.png.original_name: the original uploaded file name.image_url: the public image URL.content_type: the image MIME type.size: the final size stored in R2.created_at: creation timestamp.
For a personal image host, D1 is enough for this metadata. Introducing Postgres or MySQL would make the system heavier without much benefit.
Worker bindings
The Worker accesses R2 and D1 through bindings. A wrangler.toml can look like this:
name = "image-storage-worker"
main = "src/index.ts"
compatibility_date = "2026-05-03"

[vars]
PUBLIC_IMAGE_BASE_URL = "https://aipaint.lihuanyu.com"

[[r2_buckets]]
binding = "IMAGE_BUCKET"
bucket_name = "image-storage"

[[d1_databases]]
binding = "DB"
database_name = "image-storage-record"
database_id = "replace-with-d1-database-id"
One easy detail to miss is database_id. If the database is created with wrangler d1 create image-storage-record, the command returns this value. If it is created in the dashboard, it can also be found in the database details page.
If TinyPNG is used, the API key should be stored as a secret instead of being written into wrangler.toml:
wrangler secret put TINIFY_API_KEY
If uploads should not be public, add an admin token as well:
wrangler secret put ADMIN_TOKEN
Worker binding configuration is documented here: Wrangler configuration.
Worker API
The following simplified Worker includes:
OPTIONS: handles CORS preflight requests.POST /upload: uploads an image and optionally compresses it with TinyPNG.GET /query: queries images with pagination.DELETE /delete?id=1: deletes the image object and metadata.
interface Env {
IMAGE_BUCKET: R2Bucket;
DB: D1Database;
PUBLIC_IMAGE_BASE_URL: string;
TINIFY_API_KEY?: string;
ADMIN_TOKEN?: string;
}
const corsHeaders = {
'Access-Control-Allow-Origin': '*',
'Access-Control-Allow-Methods': 'GET,POST,DELETE,OPTIONS',
'Access-Control-Allow-Headers': 'Content-Type,Authorization',
};
export default {
async fetch(request: Request, env: Env): Promise<Response> {
const url = new URL(request.url);
if (request.method === 'OPTIONS') {
return new Response(null, { headers: corsHeaders });
}
if (request.method === 'GET' && url.pathname === '/query') {
return handleQuery(request, env);
}
if (!isAuthorized(request, env)) {
return json({ success: false, message: 'Unauthorized' }, 401);
}
if (request.method === 'POST' && url.pathname === '/upload') {
return handleUpload(request, env);
}
if (request.method === 'DELETE' && url.pathname === '/delete') {
return handleDelete(request, env);
}
return json({ success: false, message: 'Not found' }, 404);
},
};
function isAuthorized(request: Request, env: Env) {
if (!env.ADMIN_TOKEN) {
return true;
}
return request.headers.get('Authorization') === `Bearer ${env.ADMIN_TOKEN}`;
}
async function handleUpload(request: Request, env: Env) {
const formData = await request.formData();
const file = formData.get('file');
if (!(file instanceof File)) {
return json({ success: false, message: 'Missing file' }, 400);
}
if (!file.type.startsWith('image/')) {
return json({ success: false, message: 'Only image files are allowed' }, 400);
}
const objectKey = createObjectKey(file.name);
const image = env.TINIFY_API_KEY
? await compressWithTinify(file, env.TINIFY_API_KEY)
: {
body: await file.arrayBuffer(),
contentType: file.type || 'application/octet-stream',
size: file.size,
};
await env.IMAGE_BUCKET.put(objectKey, image.body, {
httpMetadata: {
contentType: image.contentType,
},
});
const baseUrl = env.PUBLIC_IMAGE_BASE_URL.replace(/\/$/, '');
const imageUrl = `${baseUrl}/${objectKey}`;
const createdAt = Date.now();
await env.DB.prepare(
`INSERT INTO images
(object_key, original_name, image_url, content_type, size, created_at)
VALUES (?, ?, ?, ?, ?, ?)`,
)
.bind(objectKey, file.name, imageUrl, image.contentType, image.size, createdAt)
.run();
return json({
success: true,
url: imageUrl,
markdown: ``,
});
}
async function handleQuery(request: Request, env: Env) {
const url = new URL(request.url);
const pageNum = Math.max(Number(url.searchParams.get('pageNum')) || 1, 1);
const pageSize = Math.min(Math.max(Number(url.searchParams.get('pageSize')) || 20, 1), 50);
const offset = (pageNum - 1) * pageSize;
const list = await env.DB.prepare(
`SELECT id, object_key, original_name, image_url, content_type, size, created_at
FROM images
ORDER BY id DESC
LIMIT ? OFFSET ?`,
)
.bind(pageSize, offset)
.all();
const count = await env.DB.prepare(`SELECT COUNT(*) AS total FROM images`).first<{
total: number;
}>();
return json({
success: true,
results: list.results,
total: count?.total || 0,
});
}
async function handleDelete(request: Request, env: Env) {
const url = new URL(request.url);
const id = Number(url.searchParams.get('id'));
if (!Number.isInteger(id) || id <= 0) {
return json({ success: false, message: 'Invalid id' }, 400);
}
const row = await env.DB.prepare(`SELECT object_key FROM images WHERE id = ?`)
.bind(id)
.first<{ object_key: string }>();
if (!row) {
return json({ success: false, message: 'Image not found' }, 404);
}
await env.IMAGE_BUCKET.delete(row.object_key);
await env.DB.prepare(`DELETE FROM images WHERE id = ?`).bind(id).run();
return json({ success: true });
}
async function compressWithTinify(file: File, apiKey: string) {
const source = await file.arrayBuffer();
const auth = `Basic ${btoa(`api:${apiKey}`)}`;
const shrink = await fetch('https://api.tinify.com/shrink', {
method: 'POST',
headers: {
Authorization: auth,
'Content-Type': file.type || 'application/octet-stream',
},
body: source,
});
if (!shrink.ok) {
const message = await shrink.text();
throw new Error(`TinyPNG shrink failed: ${shrink.status} ${message}`);
}
const outputUrl = shrink.headers.get('Location');
if (!outputUrl) {
throw new Error('TinyPNG did not return output location');
}
const optimized = await fetch(outputUrl, {
headers: {
Authorization: auth,
},
});
if (!optimized.ok) {
const message = await optimized.text();
throw new Error(`TinyPNG download failed: ${optimized.status} ${message}`);
}
const body = await optimized.arrayBuffer();
return {
body,
contentType: optimized.headers.get('Content-Type') || file.type || 'application/octet-stream',
size: Number(optimized.headers.get('Content-Length')) || body.byteLength,
};
}
function createObjectKey(filename: string) {
const extension = filename.includes('.') ? filename.split('.').pop() : 'bin';
const date = new Date().toISOString().slice(0, 10);
return `${date}/${crypto.randomUUID()}.${extension}`;
}
function json(data: unknown, status = 200) {
return new Response(JSON.stringify(data), {
status,
headers: {
...corsHeaders,
'Content-Type': 'application/json; charset=utf-8',
},
});
}
There are a few details worth calling out.
First, the upload API should verify image/*. Otherwise the image host can accidentally become arbitrary file storage.
Second, even for personal use, an ADMIN_TOKEN is worth adding. Frontend requests can send:
Authorization: Bearer admin-token
Third, TinyPNG’s API does not return output.url in the JSON response from the shrink request. After the compression request succeeds, read the Location response header, then request that URL to download the optimized image. The API behavior is documented here: Tinify API reference.
Fourth, using the original file name as object_key causes problems with non-ASCII names, spaces, and overwrites. A date prefix plus UUID is more robust.
Frontend
Any frontend framework works. The example implementation used SolidJS, but React, Vue, or Svelte would work just as well. This is not a complex app.
The core functions are upload, query, and delete.
Upload:
async function uploadImage(file: File) {
  const formData = new FormData();
  formData.append('file', file);

  const response = await fetch(`${apiBaseUrl}/upload`, {
    method: 'POST',
    headers: {
      Authorization: `Bearer ${adminToken}`,
    },
    body: formData,
  });

  if (!response.ok) {
    throw new Error(await response.text());
  }

  return response.json();
}
Query:
async function queryImages(pageNum = 1, pageSize = 20) {
  const response = await fetch(
    `${apiBaseUrl}/query?pageNum=${pageNum}&pageSize=${pageSize}`,
  );

  if (!response.ok) {
    throw new Error(await response.text());
  }

  return response.json();
}
Delete:
async function deleteImage(id: number) {
  const response = await fetch(`${apiBaseUrl}/delete?id=${id}`, {
    method: 'DELETE',
    headers: {
      Authorization: `Bearer ${adminToken}`,
    },
  });

  if (!response.ok) {
    throw new Error(await response.text());
  }

  return response.json();
}
The UI needs only a few interactions:
- Select or drag an image file.
- Show the image URL and Markdown after upload.
- List thumbnails, original file names, created times, and sizes.
- Copy URL.
- Copy Markdown.
- Delete an image.
The frontend can be deployed to Cloudflare Pages. It can live in the same repository as the Worker API or in a separate repository. For a personal project, keeping them separate is often clearer: frontend issues do not affect image access, and the Worker API can be maintained independently.
Custom domain and caching
For an image host, URL stability matters most. Once an image URL is written into a post, it should not change casually.
A practical setup:
- Use a separate subdomain for images, such as
aipaint.lihuanyu.com. - Bind the R2 bucket to that subdomain.
- Use only that subdomain in blog posts.
- Avoid embedding Worker preview domains or Pages preview domains in posts.
Images are static assets, so caching can be aggressive. In a personal blog, an uploaded image usually does not need to be replaced at the same URL. If a replacement is needed, uploading a new image and using a new URL is simpler.
Cost
The cost mainly comes from four places:
- R2 storage and requests.
- D1 reads and writes.
- Workers requests.
- TinyPNG compression usage.
Personal blog image traffic is usually read-heavy and small enough that R2 and Workers are unlikely to be the bottleneck. TinyPNG needs a separate look because it is not a Cloudflare service, and its quota and pricing follow Tinify’s own rules. If there are many images, compression can be moved to a local script, or enabled only for large uploads.
The practical tradeoff is:
- R2 is a good place to store images long term.
- D1 only stores metadata, so its cost is negligible for this use case.
- Workers is well suited for lightweight APIs like this.
- TinyPNG is useful, but not required for the first version.
For a writing workflow, the first version can skip TinyPNG and focus on upload, query, and copying Markdown. Compression can be added later when image volume or page load time starts to matter.
Boundaries
This setup is suitable for a personal image host. It should not be exposed as a public platform without more work.
If it is opened to other users, at least these parts are needed:
- User accounts.
- Permission isolation.
- Upload rate limits.
- File size limits.
- Content safety checks.
- Storage quotas.
- Delete audit logs.
- Hotlink protection or access control.
For personal use, the most important point is to keep the upload API protected. Otherwise it can be abused as public file storage.
Conclusion
Cloudflare R2 is a good fit for a personal blog image host, but stopping at “dashboard upload plus manually assembled URL” leaves too much friction in the writing workflow. A useful image host should connect upload, compression, list view, copy, and delete.
A reasonable implementation order is:
- Create an R2 bucket and bind a custom image domain.
- Add a Worker upload API.
- Store image metadata in D1.
- Build a small frontend page.
- Add TinyPNG or another compression step later.
This keeps the stability of object storage while making image insertion smooth enough for regular blogging.
Loading discussion...
Discussion failed to load. Reload